Sufity rastrowe
biuro@polstraj.pl
+48 534 107 224
  • Main
  • About us
  • Catalog
    • Louvered Ceiling
    • Strip Ceiling
    • Screen ceiling
    • Cassette ceiling
    • Bent ceilings
    • Louvered Ceiling (rectangle)
    • Installation
    • Metal Fences
  • Realizations
  • Calculate project
    • Calculate project
    • Visualisations
  • Contact
  • Partnership
  • English
    • Deutsch Deutsch
    • Polski Polski
  • biuro@polstraj.pl
    +48 534 107 224

Sufity rastrowe
  • Main Page
  • About us
  • Catalog
    • Louvered Ceiling
    • Strip Ceiling
    • Screen ceiling
    • Cassette ceiling
    • Bent ceilings
    • Louvered Ceiling (rectangle)
    • Installation
    • Metal Fences
  • Calculate project
    • Calculate project
    • Visualisations
  • Realizations
  • Contact
  • Partnership
  • Deutsch Deutsch
  • Polski Polski

Suspended ceiling assembly instructions

Step 1. Installation of the raster ceiling begins with determining its level using a laser level and drawing it on the walls. The distance from the suspended ceiling to the main ceiling must be at least 150 mm.

Step 2. A wall angle is attached around the perimeter. We mount on pins, the distance between the pins is 300-500 mm.

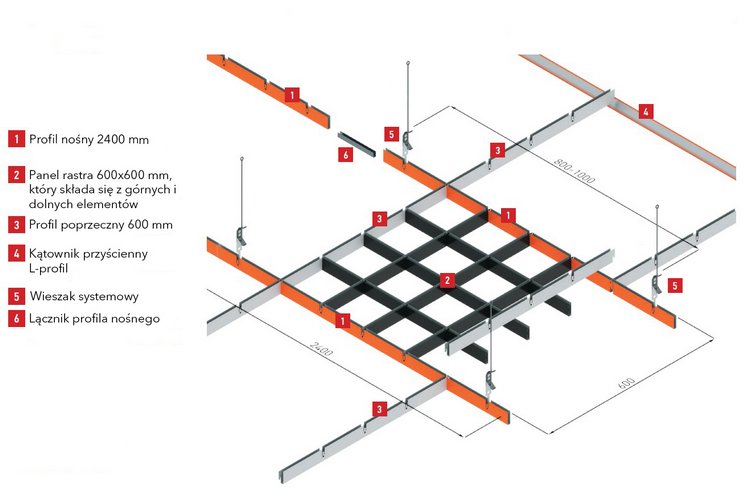
Step 3. The lines of the load-bearing profiles and the points of fixing the hangers are marked on the ceiling. The hangers are mounted on pegs previously embedded in the ceiling with a step of 800-1000 mm.
Hangers closest to the wall should be fixed at a distance not greater than 600 mm from the wall. The suspension consists of an expansion spring and two rods (with a hook and an eyelet) or a rod and a system hanger.

Step 4. Support profiles are attached to the hangers, which, when joined with perpendicular crossbars, form a grid - the structure of the raster ceiling.
We connect the load-bearing profiles with connectors.

Step 5. Collect the Upper profile and the Lower ceiling profile in a raster on a flat, clean surface.
The raster ceiling panels are mounted from the top to the prepared and properly leveled grid. The bottom profiles in the panel must be parallel to the supporting profile 2400 mm long.

Suspended Ceiling

Mounting a linear ceiling

Step 1. & nbsp; Installation of the strip ceiling begins with determining its level using a laser level and drawing it on the walls. The distance from the suspended ceiling to the main ceiling must be at least 150 mm.

Step 2. & nbsp; A wall angle is attached around the perimeter. We mount on pegs, the distance between the pegs is 300-500 mm.

Step 3. The hangers are mounted to the ceiling with expansion plugs with a spacing of 500-1000 mm. Hangers closest to the wall should be fixed at a distance of not more than 300 mm from the wall.

STEP 4. Attach the crossbeams to the hanger.

STEP 5. Installation of profiles in traverse locks.

Sufity rastrowe

POLSTRAJ Sp. Z o.o. is a leader in the production and installation of raster and strip ceilings in Poland.

Go to the website:

  • Main Page
  • About us
  • Calculate project
  • Realizations
  • Contact
  • Partnership
  • GDPR
  • Privacy policy
Sufity rastrowe
Calculate your project
Calculate the price of materials and assembly
Sufity rastrowe
How to mount it?
Read the assembly instructions!

Contacts

  • Phone: +48 534 107 224
  • Email: biuro@polstraj.pl
  • Address: Juliana Ursyna Niemcewicza 26/lok 8U, 02-022, Warszawa
2021 Created By Kadmix

If you would like a free consultation and quote, give us your name and phone number. We'll call you back as soon as possible.